HTML
Styling
CSS
Dashcam Installation
Vehicle Safety

Guía de instalación de la cámara de salpicadero

//lifestories.top/How-to-Find-Senior-Fitness-Classes-You'll-Enjoy>Before diving into a fitness plan, it's crucial to honestly assess your current physical capabilities. This self-evaluation helps you establish realistic goals and avoid injury. Consider factors like your current activity level, any existing health conditions, and any limitations you might have. Understanding your baseline fitness level allows you to tailor your workout routine accordingly, ensuring gradual progress and long-term success. A realistic assessment is key to avoiding burnout and fostering a sustainable fitness journey. It allows you to build a plan that's achievable and enjoyable, thus increasing your likelihood of sticking with it.

Testing and Setting Up the Dash Cam

Initial Setup and Mounting

Before you begin recording, meticulously plan the mounting position of your dash cam. Consider the visibility of the camera lens, ensuring it captures the road ahead without obstructions from the windshield or other vehicles. Proper mounting is crucial for clear and unobstructed video recordings. A secure mounting position is essential to prevent the dash cam from shifting or falling during driving, potentially damaging the device or affecting the recording quality. Thoroughly review the mounting instructions provided with your dash cam model to ensure you are following the manufacturer's recommendations for optimal installation.

After selecting the ideal mounting spot, carefully attach the dash cam mount to your windshield. Use the provided adhesive or suction cup mounts, ensuring a firm and secure grip. Avoid using excessive force, as this could damage the windshield or the mount itself. Take your time and double-check the placement of the mount before tightening the screws to prevent any future issues. Proper mounting is critical for capturing clear and consistent footage throughout your driving experience.

Connecting the Dash Cam and Power

Connecting the dash cam to your vehicle's power source is a crucial step in ensuring continuous recording. Locate the appropriate power source, such as a 12V outlet, and carefully connect the dash cam's power cable. Ensure the connection is secure and doesn't pose a risk of damaging the electrical system of your vehicle. Incorrect wiring can lead to malfunctions or damage to your dash cam, so take your time and double-check all connections before starting the vehicle. A proper power connection is essential for uninterrupted recording, especially during long drives, and to prevent any data loss.

Once connected, power on the dash cam and verify that it's functioning correctly. Check the display screen for any error messages or indicators that something is amiss. Review the user manual to understand the various settings and features of your dash cam. Properly configuring the settings will help optimize the recording quality. Confirm that the dash cam is recording video smoothly before proceeding to the next step.

Testing the Recording Functionality

After completing the initial setup and power connection, you should conduct a thorough test to ensure the dash cam is functioning properly. Start the vehicle and allow the dash cam to record for a few minutes. Observe the recording process on the screen, ensuring the video is clear and stable. Pay attention to any potential issues, such as blurry footage, intermittent recordings, or other malfunctions. If you encounter any problems, carefully review the user manual or contact customer support for assistance.

Once you've verified that the dash cam is recording correctly, you can proceed to use it for your daily driving. Ensure that the recording settings are configured to your liking. Review the recording resolution, time intervals, and any other parameters that affect the quality and quantity of your recorded footage. Regularly checking and adjusting these settings will ensure optimal performance and functionality of your dash cam throughout your driving experience. Proper testing ensures that your dash cam is ready for use in any driving situation.

Read more about Guía de instalación de la cámara de salpicadero

¿Por qué el mantenimiento preventivo evita reparaciones costosas de vehículos?
Apr 29, 2025
Señales de advertencia temprana ¿Está experimentando problemas con la transmisión continuamente variable (CVT) de su vehículo? Reconocer las señales tempranas de problemas con la transmisión CVT puede evitar reparaciones costosas y asegurar que su vehículo...
May 06, 2025
La importancia del par de torsión correcto en la instalación de las ruedas
May 06, 2025
Identificación de señales de advertencia comunes de falla del convertidor catalítico
May 10, 2025
Pasos prácticos para preservar la salud de la batería de vehículos híbridos
May 16, 2025
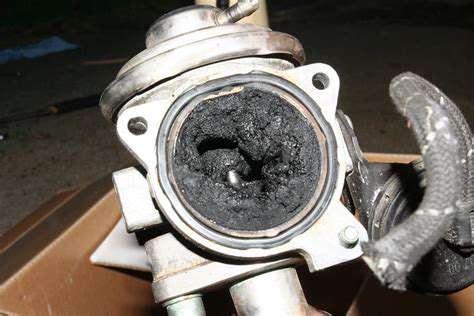
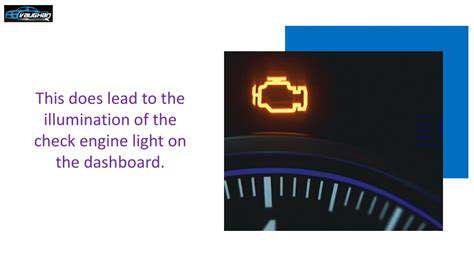
Entendiendo el papel de las válvulas EGR en los sistemas de control de emisiones
May 18, 2025
Soluciones prácticas para prevenir la contaminación del aceite diferencial
May 21, 2025
Soluciones integrales para la reparación y el refuerzo de los chasis de automóviles
May 23, 2025
Guía de un experto para mantener la pintura del automóvil bajo una intensa exposición a los rayos UV
May 23, 2025
Asientos de carreras: comodidad y soporte
Jun 08, 2025
Impresión 3D de Piezas de Automóviles: Prototipado Rápido
Jun 28, 2025
Extensores de Camas de Camión: Más Espacio de Carga
Jul 04, 2025
View Blog>>