Differences between drum and disc brake maintenance
The inspection process should examine:- Pad/shoe thickness (replace below 3mm)- Rotor/drum surface condition- Fluid level and color (dark fluid needs changing)- Hose and line integrityProfessional shops use thickness gauges and hydraulic testers that most DIYers lack, making annual pro inspections worthwhile.
Identifying Signs of Brake System Malfunction
Your car communicates brake issues through unmistakable signals. That high-pitched squeal when stopping? That's literally a built-in wear indicator - a small metal tab designed to screech against the rotor when pads thin. More concerning symptoms include:
- Pulling to one side (stuck caliper or contaminated pads)- Pulsating pedal (warped rotors)- Spongy feel (air in lines or failing master cylinder)- Illuminated brake warning lightAddressing these immediately prevents expensive damage and keeps your stopping power reliable when you need it most.
Brake Fluid Maintenance and Replacement
Many drivers overlook their brake fluid, yet this hygroscopic liquid absorbs 3% water annually, lowering its 500°F boiling point. Contaminated fluid vaporizes during hard braking, causing dangerous pedal fade. Mechanics recommend:
- DOT 3/4 fluid: Change every 2 years- DOT 5 silicone: Change every 5 years- Always use factory-specified typeA simple test strip can check moisture content, while professional flush machines completely replace old fluid - critical for ABS systems where air bubbles cause malfunctions.
Brake Pad and Rotor Replacement
The pad-rotor relationship is a carefully engineered dance. Cheap aftermarket parts often create noise problems because their friction material differs from OEM specifications. When replacing:
- Always bed-in new pads properly (10 moderate stops from 40mph)- Replace pads in axle sets- Resurface or replace warped rotors- Use brake grease on contact pointsPerformance drivers might opt for slotted rotors and ceramic pads, while urban commuters prefer quiet organic compounds - choose based on your driving style.
Troubleshooting Common Brake System Problems
Diagnosing brake issues requires methodical thinking. A systematic approach isolates problems efficiently:
1. Noise diagnosis: - Squeak: Glazed pads or lack of shims - Grinding: Metal-on-metal contact - Clicking: Loose components2. Performance issues: - Long stops: Contaminated pads - Vibration: Warped rotors - Soft pedal: Air in systemComplex issues like ABS faults require professional scan tools, but many common problems are DIY-friendly with proper guidance.
Drum Brake Maintenance: A Closer Look
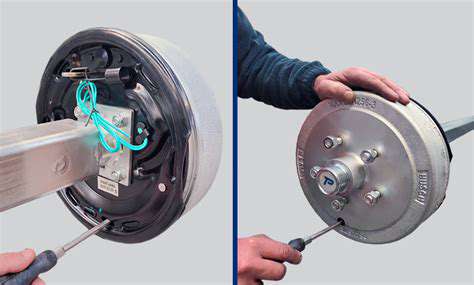
Drum Brake Inspection
While fading from front brakes, drum systems still dominate rear wheels on economy cars. Their enclosed design makes inspection more involved than disc brakes. Proper assessment requires:
- Removing drums (often needing adjustment retraction)- Checking shoe lining thickness (replace below 1/8)- Inspecting for fluid leaks from wheel cylinders- Testing return spring tensionRust accumulation inside drums is normal, but deep scoring requires machining or replacement. Always clean dust boots to prevent moisture trapping.
Brake Shoe Adjustment
Self-adjusting mechanisms fail over time, making manual adjustment necessary. Proper shoe-to-drum clearance is measured in thousandths of an inch - too tight causes drag, too loose increases pedal travel. The process:
1. Lift vehicle and remove inspection plug2. Rotate star wheel adjuster until slight drag3. Back off 5-7 clicks for proper clearance4. Test pedal feel and parking brake operationThis simple procedure restores parking brake effectiveness and normal pedal height.
Brake Lining Replacement
Drum brake jobs require more patience than disc work. The spring-loaded assembly demands careful handling - many mechanics photograph components before disassembly. Key steps:
- Use proper spring tools (never pliers)- Clean and lubricate contact points- Apply dielectric grease to backing plates- Burnish new linings with 20 moderate stopsQuality replacement kits include all necessary springs and hardware - never reuse old tension components.
Drum Replacement
Worn drums exhibit telltale symptoms:- Deep grooves catching fingernail- Visible heat cracks- Out-of-round wobbleMachining removes minimal material - most manufacturers specify 0.060 maximum cut. Beyond this, replacement is mandatory for safe operation. Always replace drums in pairs to maintain balanced braking.
Wheel Cylinder Inspection
These hydraulic pistons commonly leak after 100,000 miles. Early signs include fluid trails inside the drum and uneven shoe wear. Replacement involves:
- Bleeding the brake system afterwards- Using flare wrenches to prevent line damage- Applying thread sealant to bleeder screwsRebuild kits exist, but complete cylinders are often more cost-effective considering labor time.
Safety Precautions
Drum brake work presents unique hazards. Those heavy drums can weigh 15+ pounds - always support them when removing. Other precautions:
- Wear gloves (brake dust contains harmful metals)- Use safety glasses when dealing with springs- Properly dispose of asbestos-containing linings- Never compress pistons without opening bleederTaking these measures prevents injuries and ensures quality repairs.
Key Differences in Maintenance Procedures
Drum vs Disc Maintenance
These systems demand different approaches. Disc brakes offer easier visual inspection - just look through the wheel spokes. Drum systems require physical disassembly for proper evaluation. Key contrasts:
| Feature | Drum Brakes | Disc Brakes ||---------|------------|------------|| Inspection | Remove drum | Visual || Adjustment | Manual | Automatic || Part Replacement | More labor | Less labor || Heat Dissipation | Poor | Excellent |Understanding these differences helps allocate maintenance time appropriately.
Fluid Service Considerations
All hydraulic systems need fluid care, but ABS modules demand special bleeding procedures. Many modern vehicles require scan tools to cycle valves during bleeding. Other nuances:
- DOT 5 silicone fluid can't mix with DOT 3/4- Some performance fluids absorb moisture faster- Reservoir design affects fluid replacement easeConsult your service manual for model-specific requirements beyond standard bleeding.
Parking Brake Systems
This critical safety system varies by configuration. Integrated caliper systems simplify maintenance, while separate drum-in-hat designs duplicate work. Common issues include:
- Stuck cables (especially in snowy regions)- Over-adjusted shoes causing drag- Seized equalizer mechanismsAnnual lubrication of cables and mechanisms prevents most parking brake failures.
Cost Comparison
Maintenance expenses differ significantly. Disc brake jobs typically cost 20-30% less due to easier access. Sample cost comparisons:
| Service | Drum Estimate | Disc Estimate ||---------|--------------|--------------|| Pad/Shoe Replacement | $150-250 | $100-200 || Rotor/Drum Replacement | $200-400 | $150-300 || Complete Overhaul | $500-800 | $400-600 |These differences explain the automotive industry's shift toward disc systems.
Read more about Differences between drum and disc brake maintenance