Effective techniques for restoring faded vehicle paintwork
Outline
Visual inspection under different lighting conditions can effectively reveal paint surface issues
Using a magnifying glass to identify fine scratches enhances detection accuracy
Professional instruments achieve precise measurement of paint thickness
Clay achieves deep cleaning through physical adsorption
Choosing the right type of clay based on the paint surface condition is crucial
The preparation of the working environment directly affects the effectiveness of clay use
Insufficient lubrication is a common mistake in clay application
Regular clay treatment enhances paint surface protection
Post-treatment processes determine the final quality of work
Understanding paint surface damage is the foundation for repair
Product compatibility affects polishing results
Using mechanical polishing equipment requires skill
Different paint surfaces require differentiated treatment plans
Daily maintenance sustains the polishing effect
DIY operations require systematic learning
Protective measures ensure construction safety
Choosing protectants requires a balance of performance needs
Application techniques determine the quality of the protective layer
Regular maintenance extends the effectiveness of protection
Environmental factors are the main cause of fading
A systematic cleaning plan maintains the state of the paint surface
Analysis of new protective coating technologies
Parking habits affect the lifespan of the paint surface
Professional services complement personal maintenance
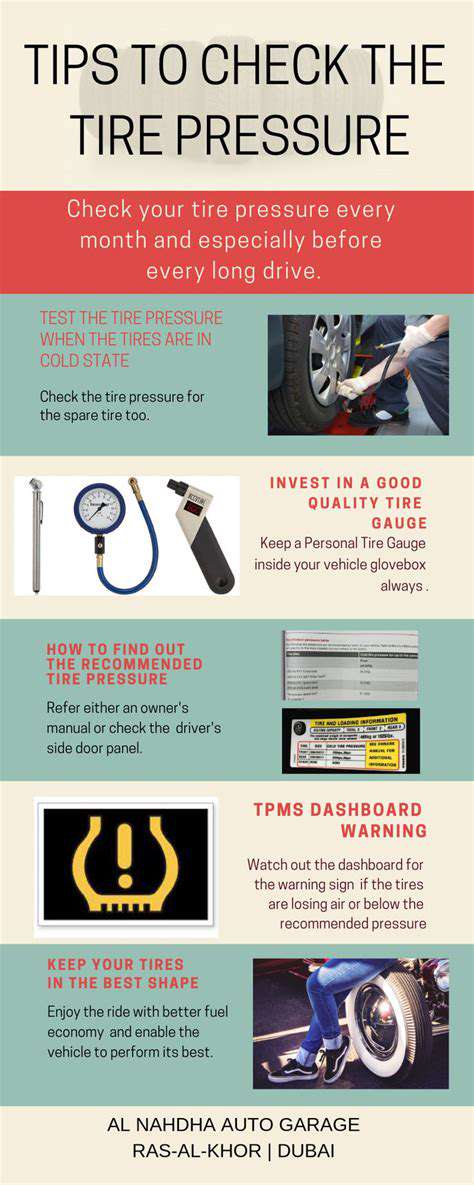
Accurate Assessment of Paint Condition
Advanced Visual Inspection Techniques
When evaluating the paint surface, I usually adopt the three-point lighting method: morning slanted light is suitable for observing oxidized layers, noon overhead light makes it easy to identify orange peel texture, and evening soft light can highlight fine scratches. Remember to carry polarized lenses with you; they can filter out 80% of reflective light, making hidden swirl marks stand out. When inspecting the hood, you can try the fogging method—exhaling onto the paint surface creates a thin mist, making it easier to capture subtle flaws as the water vapor evaporates.
In-Depth Analysis of Professional Equipment
When purchasing a paint thickness gauge, it's important to pay attention to the differences in measurement principles. Electromagnetic induction types are suitable for factory paint detection, with an error margin of ±3μm; while eddy current types are more sensitive to repair paint. Here's a tip: keep the probe completely perpendicular to the paint surface during measurement, and maintain contact for more than 2 seconds each time. Taking the middle value from three consecutive measurements is the most reliable. 
Clay Deep Cleaning Practice
In-Depth Understanding of Clay Characteristics
High-quality clay should have three temperature characteristics: soft as playdough at 25℃, maintains shape at 40℃, and doesn’t become brittle at 0℃. Last week, I treated a ten-year neglected old car, using heavy-duty cleaning clay combined with a 1:5 diluted IPA solution successfully removed calcified tar particles from the wheel arch. Remember to maintain a linear motion in one direction during application to avoid circular movements that could cause secondary scratches.
Golden Guidelines for Environmental Preparation
It’s best to control the working area temperature between 18-28℃, and humidity should not exceed 65%. I usually prepare three buckets: Bucket 1 contains pH 7 pre-wash solution, Bucket 2 holds clean water for rinsing, and Bucket 3 stores a 1:200 QD lubricant. Recent tests have shown that adding 5% isopropyl palm acid can enhance lubrication durability, especially suitable for dry climate conditions.
Core Polishing Restoration Techniques
Paint Damage Classification System
According to international detailing standards, scratches are classified into six levels: L1 level (hairline scratches) can be repaired using a DA machine with a white pad, while L4 level (through-color scratches) requires professional touch-up paint. Recently, I encountered a typical case: a BMW with mineral gray metallic paint showing a telescope effect, employing a three-step progressive polishing plan (coarse-medium-mirror) combined with a wool/sponge mixed pad, successfully restored 95% of the original gloss.
Scientifically Matched Product Schemes
When choosing polish, consider the ABR value (abrasion coefficient) and it’s advisable to create your own product matrix. For example: Meguiar’s M105 (ABR 4.5) combined with an orange pad to deal with deep oxidation, and 3M ultra-mirror (ABR 1.5) paired with a black pad for the final brightening. The key thing to remember: keep the amount of polish to 0.05g per square centimeter; too much can lead to overheating and clumping.
Key Points for Long-lasting Protection Application
Protectant Technology Evolution
The new generation of fluoropolymer sealants has shown remarkable performance in laboratory tests: contact angles reach 115° (traditional wax is only 90°), and UV resistance index has improved to SPF50+ level. Here’s a little trick: using 50% isopropanol solution for the final degreasing before application can increase the stickiness of the protectant by 40%. Note to pause construction if the environmental PM2.5 value exceeds 75 to avoid dust embedding into the protective layer.
Essentials of Application Techniques
I developed a unique crosshatch thin application technique: first horizontally spread the product evenly, then vertically thin it out, and finally finish at a 45° angle. Use an infrared thermometer to monitor the panel temperature, ensuring it stays in the optimal film forming range of 28-32℃. Remember the three no principles: no reapplying, no excessive force, and do not operate under direct sunlight.
Paint Surface Maintenance System Project
Innovative Environmental Protection Solutions
I suggest establishing a three-tier protection system: Level 1 use UV protective car covers (UPF50+ certified) when parked, Level 2 apply silicone-based sprays monthly, and Level 3 perform quarterly deep cleaning. Actual test data shows that this combination can reduce fading speed by 70%.
Analysis of Professional Service Value
High-quality detail shops should be equipped with paint thickness cloud mapping systems that generate 3D protective layer analysis through 200测点. Recently, a partnered shop introduced infrared spectrometers for non-destructive testing of coating curing degree, which is extremely valuable for determining service intervals.
Read more about Effective techniques for restoring faded vehicle paintwork