Automotive
Engineering
HTML
Styling
Starter Motor

Identifying and resolving common starter motor problems

a dying solenoid, worn starter gears, or even just loose battery connections that need tightening.

Before panicking, try this simple fix: clean and tighten those battery terminals. If the stubborn clicking continues, it's time to call in a professional. Ignoring these warning sounds could leave you stranded when you least expect it.

Difficulty Cranking or Slow Cranking

When your engine turns over sluggishly like it's moving through molasses, you're likely dealing with a starter issue. This frustrating symptom might come from a weak battery that can't deliver enough juice, a starter motor on its last legs, or problematic electrical connections. That extra second or two of cranking time is your vehicle's way of begging for attention.

A starter motor nearing the end of its lifespan often struggles internally, sometimes accompanied by ominous clicking or grinding noises. Pro tip: Address slow cranking immediately - putting it off could mean costly repairs later when the starter fails completely.

Grinding or Grinding Sounds

That awful metal-on-metal grinding noise during startup isn't just annoying - it's a red alert. This harsh sound usually means your starter's gears are either worn down or misaligned, potentially causing damage every time you start the car. Whether it's constant or comes and goes, this symptom demands immediate attention.

Continuing to operate with this issue risks serious damage to both your starter and engine components. The repair bill only grows the longer you wait - schedule a mechanic visit at the first sign of grinding.

No Crank at All

When turning the key yields absolute silence, you're facing every driver's nightmare. This complete failure to crank could indicate a dead battery, failed starter motor, or serious electrical issues. Safety first: Before troubleshooting, ensure your vehicle is in park or neutral with the parking brake engaged.

Start with basic checks - battery terminals, connections, and visible wiring. If these look good, it's time for professional diagnostics to prevent further damage and get you back on the road safely.

Analyzing Starter Motor Operation Principles

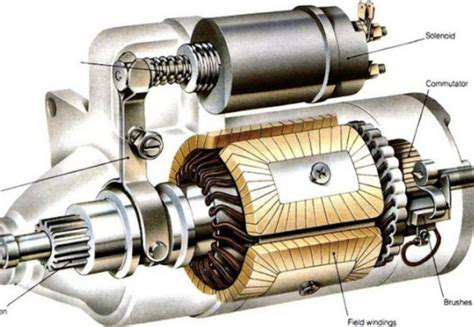
Understanding the Basic Components

The starter motor serves as your engine's wake-up call, transforming electrical energy into the mechanical motion needed to start combustion. At its heart lies the armature - a spinning core of copper windings that does the heavy lifting. Working alongside it, the solenoid acts as the system's switchboard operator, coordinating the connection between starter and engine.

Proper maintenance of these components ensures reliable starts for years to come. When any part fails, your morning commute could turn into an unexpected day off.

The Role of the Solenoid

This unsung hero of your starting system performs two crucial jobs simultaneously. When you turn the key, it both completes the high-current circuit to the starter motor and physically engages the starter gear with the engine's flywheel. Its spring-loaded disengagement mechanism is equally important - preventing damage once the engine starts running independently.

Electrical Circuitry and Power Supply

Your starter motor demands more electrical current than any other vehicle system - often over 200 amps during cranking. That's why clean, tight connections throughout the circuit are non-negotiable for reliable operation. Corrosion or loose wiring anywhere in this high-current path can spell trouble on cold mornings.

The Engagement Mechanism

The precision dance between starter gear and flywheel happens in milliseconds but requires perfect timing. Too early or late engagement causes that dreaded grinding noise, while failure to engage means no start at all. Modern starters use sophisticated designs to ensure smooth, reliable engagement every time.

Operational Sequence During Starting

From key turn to engine roar happens in a carefully choreographed sequence: electrical signal activates solenoid, solenoid engages gear and powers motor, motor spins engine until combustion takes over. Understanding this sequence helps diagnose where problems occur when starting fails.

Common Issues and Troubleshooting

Most starting problems fall into three categories: electrical (battery/connections), mechanical (gears/bearings), or solenoid-related. A methodical approach testing each component saves time and money compared to random part replacements.

Maintenance and Prevention

Regular battery checks and terminal cleaning provide the cheapest insurance against starting problems. For the starter itself, listen for changes in sound and note any slower cranking - these early warnings allow proactive replacement before failure. CheckingtheBatteryandWiringforStarterMotorProblems

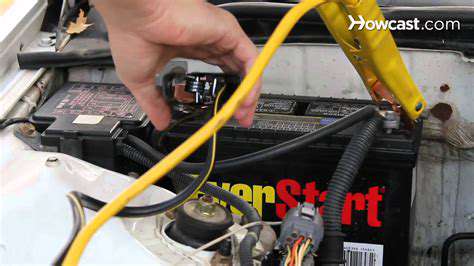
Inspecting Starter Motor Components for Wear and Tear

InspectingStarterMotorComponentsforWearandTear

Inspecting the Starter Motor Solenoid

The solenoid serves as both switch and actuator - making it the starter system's most failure-prone component. Look for telltale signs like cracked housing, corroded terminals, or melted plastic. Professional testing can verify if weak activation or sticking is occurring internally.

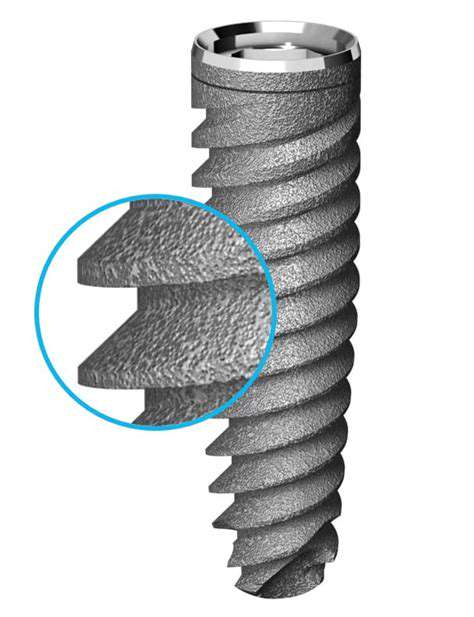
Evaluating the Starter Motor Gear and Drive

Worn or chipped gear teeth create that distinctive grinding noise during engagement. More concerning, metal fragments from damaged gears can circulate through your engine with catastrophic results. Also check the drive mechanism moves freely without binding - resistance here often precedes complete failure.

Assessing the Starter Motor's Electrical Connections and Wiring

Heat and vibration take their toll on starter wiring over time. Look for cracked insulation, green corrosion on terminals, or melted wire jackets indicating overheating. Remember: the starter draws more current than your entire house's lighting circuits - proper connections are critical for safety and reliability.

Read more about Identifying and resolving common starter motor problems

Discover the essential strategies for maintaining your vehicle's differential and optimizing overall performance. Our detailed article covers regular inspection techniques, the importance of fluid maintenance, the role of diagnostics, and tire wear analysis. Learn how to recognize early signs of differential issues, implement effective vibration and temperature monitoring, and engage in predictive maintenance to prevent costly failures. Equip yourself with knowledge and best practices for proactive vehicle care, ensuring safety and longevity on the road. Explore training programs designed for mechanics and enthusiasts alike to enhance awareness and skills in identifying differential failures. Transform your approach to automotive maintenance today!
Mar 09, 2025
The Cornerstone of Electrical DiagnosisA multimeter is integral to automotive diagnostics, enabling technicians to measure voltage, current, and resistance accurately. Understanding how to use these functions is vital for diagnosing electrical faults effectively. For instance, measuring voltage helps ascertain if components are receiving adequate power, while current testing verifies if components operate within specified limits. Choosing the Right MultimeterWhen selecting a multimeter, consider features that align with your diagnostic needs. Brands like Fluke and Klein offer durable, reliable options equipped with useful features such as auto-ranging, data logging, and backlit displays, which enhance usability in various conditions. 2. Oscilloscope: Analyzing Waveforms for Deeper InsightsOscilloscopes are essential for analyzing electronic signals in vehicles. Unlike multimeters that providescalar measurements, oscilloscopes capture waveforms, revealing subtle fluctuations that can indicate underlying issues. Familiarity with an oscilloscope's functions, including triggering and data storage, is key to maximizing its effectiveness in diagnostics. 3. Scan Tool: Accessing On-Board Diagnostic DataModern vehicles utilize On-Board Diagnostics (OBD) systems to provide deeply integrated information about vehicle health. Scan tools allow technicians to access this data, including Diagnostic Trouble Codes (DTCs) and real-time data. Choosing the right scan tool, from basic models for routine checks to advanced devices supporting various makes and models, can significantly enhance diagnostic capabilities. 4. Power Probe: Testing Circuit IntegrityThe power probe is a versatile tool for testing voltage, resistance, and current flow within a circuit. It is instrumental in identifying issues like shorts and opens. Learning techniques such as voltage drop testing and continuity testing can enhance the accuracy of diagnostics while improving repair efficiency. 5. Wiring Diagrams and Circuit Testers: Comprehensive UnderstandingWiring diagrams are foundational for troubleshooting automotive electrical systems. They visually illustrate connections and functions within the vehicle, allowing technicians to pinpoint issues quickly. Circuit testers, including both multimeters and test lights, further aid in diagnosing faults, such as open circuits or shorts. Best Practices in DiagnosticsImplementing proper diagnostic practices can greatly enhance repair efficiency. Begin with thorough visual inspections, document findings meticulously, and leverage mobile applications for access to service manuals and wiring diagrams. Collaborative environments among technicians also foster knowledge sharing and improved problem-solving.In conclusion, equipping yourself with essential diagnostic tools like multimeters, oscilloscopes, scan tools, power probes, and wiring diagrams while adhering to best practices can drastically improve the speed and accuracy of automotive repairs. By investing in quality tools and continuously updating your skillset, you can ensure optimal vehicle performance and customer satisfaction.
Apr 13, 2025
A Comprehensive GuideCar diagnostic tools are essential for both car owners and automotive professionals, providing valuable insights into vehicle performance and potential issues. This comprehensive guide will help you understand the basics of car diagnostic tools, the different types available, and how to choose the right tool for your needs. What Are Car Diagnostic Tools?Car diagnostic tools serve a crucial role in modern automotive repair, identifying problems before they escalate. They can read and clear diagnostic trouble codes (DTCs), perform live data analysis, and much more. With the advancement of vehicle technology, having a reliable diagnostic tool is indispensable. There are two main types: standalone scanners and advanced software tools that connect to computers or mobile devices. Types of Car Diagnostic Tools1. OBD-II Scanners: These are the most common diagnostic tools, designed to connect with the On-Board Diagnostics system standard in vehicles manufactured after 1996. They excel at both reading error codes and providing real-time data on engine performance.2. Enhanced Diagnostic Scanners: More sophisticated than basic OBD-II scanners, these tools can access advanced systems like ABS and airbag diagnostics and can read proprietary codes and perform system resets.3. Code Readers: Ideal for beginners, they allow users to read and clear DTCs without advanced functions. While good for simple diagnostics, they may not monitor live data, limiting deeper troubleshooting.4. Professional Scan Tools: Designed for experienced mechanics, these tools offer extensive features, including live data analysis and bi-directional control for complex issues like programming ECUs. Key Features to ConsiderWhen selecting a car diagnostic tool, look for:- Compatibility: Ensure the tool is suitable for a wide range of makes and models.- User Interface: An intuitive, clear interface is vital for efficient navigation.- Live Data Streaming: This allows monitoring of real-time parameters from various systems.- Data Logging and Reporting: Essential for providing detailed vehicle health reports to customers.- Price and Warranty: Balance features with your budget while ensuring long-term reliability through warranties and customer support. Budget ConsiderationsEstablish a clear budget for your diagnostic tool purchase. High-quality tools may initially seem expensive but can save time and money in the long run. Members of DIY communities often recommend investing in a tool with comprehensive functionalities for reliability and efficiency. Making the Right ChoiceIn conclusion, choosing the right car diagnostic tool involves understanding your specific needs, evaluating different types, and balancing features with your budget. Whether you're a novice car owner or an experienced mechanic, the right tool can enhance your vehicle maintenance capabilities and improve your repair efficiency. By doing your research and considering factors such as long-term value, warranty, and customer support, you can confidently select a tool that meets your diagnostic needs.For more insights on automotive maintenance, explore our related articles on vital topics in vehicle care and diagnostics.
Apr 17, 2025
Why proactive maintenance prevents costly vehicle repairs
Apr 29, 2025
Analyzing the effects of brake fluid contamination on safety
Apr 29, 2025
Balancing efficiency and safety in high performance tires
Apr 29, 2025
Professional insights into evaluating used car reliability
Apr 30, 2025
Understanding the compatibility of biofuels with car engines
Apr 30, 2025
A Multi-Layered ApproachProtecting Your Home from the ElementsExterior rustproofing is a crucial aspect of home maintenance, safeguarding your property from the detrimental effects of corrosion. This multi-layered approach details preventative measures, from initial surface preparation to ongoing maintenance, ensuring the longevity and structural integrity of your home.Preemptive Protection:Implementing a robust exterior rustproofing strategy is crucial to preserving the structural integrity and aesthetic appeal of your home. This proactive approach focuses on preventing rust from taking hold in the first place, rather than simply reacting to its effects. A critical first step involves a thorough inspection of all exposed metal components, including gutters, downspouts, fences, railings, and window frames. Identifying areas prone to moisture accumulation or damage is paramount for targeted rustproofing.Surface Preparation is Key:Thorough surface preparation is the foundation of any effective rustproofing strategy. This often includes cleaning the affected metal surfaces to remove dirt, rust scales, and loose paint. A wire brush, pressure washer, or specialized cleaning solution may be necessary, depending on the severity of the rust and the material's condition. This step ensures that the rustproofing material adheres properly, maximizing its effectiveness.Protective Coatings: Choosing the Right Materials:Properly selecting a rustproofing coating is critical. Different materials offer varying levels of protection and durability. Consider factors like the environment your home is exposed to, the specific metal type, and the desired longevity of the protection.* Paints: Various paints with rust-inhibiting properties can effectively protect metal surfaces. Consider the specific formulation and its ability to resist chipping and cracking.* Coatings: Specialized rustproofing coatings offer a robust barrier against moisture and corrosion. These products may be formulated with zinc or other corrosion-resistant metals, providing a long-term defense against the elements.Systemic Protection: A Multi-Layered Approach:A multi-layered approach often yields the best results. Starting with a primer or a corrosion-resistant undercoat can create a stronger foundation for the topcoat. Regular reapplication, as recommended by the manufacturer, is crucial for maintaining the protective barrier and extending the life of the coating.Ongoing Maintenance for Long-Term Protection:Rustproofing is not a one-time fix. Regular inspection and maintenance are key to sustaining the integrity of your protection.* Monitor for Signs: Regularly check for signs of rust, peeling paint, or moisture buildup. Early detection allows for prompt intervention to prevent further damage.* Address Issues Quickly: Any signs of rust or corrosion should be addressed immediately. This often involves removing the affected material and reapplying protective coatings.* Protecting from Water: Ensuring proper drainage around your home is critical in preventing moisture accumulation that can accelerate rust. Inspect and repair gutters, downspouts, and flashing to divert water away from vulnerable areas.Conclusion:By adopting a multi-layered approach to exterior rustproofing, you can significantly extend the lifespan of your home's metal components, saving money and maintaining its structural integrity. Regular inspection, proper surface preparation, and choosing the right protective coatings are essential elements of this strategy.
Apr 30, 2025
Advanced strategies for ensuring longevity of vehicle chassis
Apr 30, 2025
Essential Regular Checks and ServicingMaintaining your vehicle's Anti-lock Braking System (ABS) is crucial for safety and performance. Understanding how ABS works and staying on top of its maintenance can prevent accidents and costly repairs. This article delves into the key aspects of ABS maintenance, guiding you through essential checks and servicing tips to keep your braking system in optimal condition. What is ABS?The Anti-lock Braking System (ABS) is designed to prevent wheel lock-up during braking. By modulating brake pressure, ABS allows drivers to maintain steering control during hard braking, particularly in slippery conditions. A well-functioning ABS not only enhances safety but also improves overall driving control. Importance of Regular ABS ChecksTo ensure the reliability of your ABS, regular inspections are necessary. While the system is designed to self-check, external factors such as harsh weather conditions, wear and tear on components, and fluid levels can affect its functionality. Here are some routine checks you should consider: 1. Brake Fluid Level and QualityBrake fluid plays a vital role in the functioning of the ABS. Regularly check the fluid level and its condition. If the fluid appears dark or contaminated, it's a sign that it needs to be replaced. Remember, keeping the brake fluid clean helps maintain the hydraulic properties essential for effective braking. 2. ABS Warning LightPay attention to the ABS warning light on your dashboard. If this light illuminates, it indicates a malfunction within the ABS system. Ignoring this warning can lead to compromised braking performance. Diagnostics should be undertaken promptly to identify and rectify the issue. 3. Sensor FunctionalityABS relies on wheel speed sensors to detect wheel rotation and prevent locking. Make it a routine to inspect these sensors for any dirt or damage. A malfunctioning sensor can lead to undesired ABS behavior and must be addressed immediately. 4. Brake Pads and RotorsEnsure that your brake pads and rotors are in good condition. Worn-out pads can affect the overall performance of the ABS. Regular inspection and timely replacement are key to maintaining effective braking performance. 5. Professional ServicingWhile many ABS checks can be performed by vehicle owners, it’s advisable to seek professional help for thorough diagnostics, especially if you notice any irregularities during your inspections. Professional mechanics have specialized tools to diagnose and service ABS issues accurately. ConclusionIn summary, maintaining your Anti-lock Braking System through regular checks and timely servicing is essential for your safety on the road. By understanding its components and functions, you can ensure that your ABS operates efficiently and effectively. Prioritize your vehicle’s braking system maintenance and consider professional assistance for any concerns. Drive safe, and enjoy peace of mind knowing your braking system is in top shape.For more information on ABS maintenance and automotive safety, stay tuned to our blog!
Apr 30, 2025
Advanced techniques for improving vehicle aerodynamics
May 01, 2025
View Blog>>