Practical solutions for addressing suspension squeaks and noises
Locating the Noise Source
Pinpointing the exact source of a sound is crucial for effective troubleshooting. A systematic approach, starting with the general area and progressively narrowing down the possibilities, is key. Consider the characteristics of the sound – is it high-pitched, low-pitched, rhythmic, sporadic? These clues can help you determine whether the noise originates from a mechanical part, a faulty electrical component, or something else entirely. Careful observation and methodical investigation are essential for identifying the root cause and implementing the correct solution.
Often, a sound's location can be determined by listening carefully from different angles. Moving around the affected area and noting where the sound is loudest or most prominent can provide valuable insights. For example, if a noise is particularly loud near a specific appliance, it's a strong indication that the problem lies within that area. Taking detailed notes and sketching a diagram of the affected area can also help visualize the sound's path and intensity, leading to a more accurate diagnosis.
Analyzing the Sound's Characteristics
Understanding the nature of the noise is critical for troubleshooting. Is it a continuous hum, a clicking sound, a screeching noise, or something else? The sound's frequency, intensity, and duration can significantly impact the efficiency of the diagnostic process. For instance, a high-pitched, intermittent squeal might indicate a worn-out bearing, while a low, constant rumble could point to an issue with the foundation or structural elements. Paying close attention to these details can significantly narrow down the possibilities and guide the troubleshooting steps.
Beyond the sound itself, consider other factors that might be contributing to the noise. Changes in temperature, humidity, or vibration patterns can affect the way a machine operates, potentially causing or exacerbating sounds. Observing the surroundings and documenting any unusual conditions can help isolate the problem and lead to a more comprehensive understanding of the noise's origin. Combining careful listening with environmental observation is often vital for successful resolution.
Using Tools and Techniques
Utilizing appropriate tools and techniques can enhance the effectiveness of sound analysis. For example, a sound level meter can measure the intensity of the noise, providing quantitative data that can be crucial for identifying the source. Specialized equipment, such as vibration sensors, can pinpoint the location of vibrations that might be causing the sound. Furthermore, visual inspection of potentially problematic areas, such as electrical connections or mechanical components, can uncover hidden sources of the noise. By combining auditory and visual assessments with the use of appropriate tools, you can gather a more comprehensive understanding of the problem and implement the most effective solution.
Using a stethoscope or similar tool can also be helpful in isolating the exact source of the noise. This can be particularly useful in identifying problems with internal components. In certain cases, disassembling parts might be necessary to get a clearer view of the problem area. It is vital to take precautions when disassembling equipment and to follow safety guidelines to avoid potential risks. Thoroughly documenting each step of the process is important to keep track of the troubleshooting process and avoid making mistakes.
Documenting all steps and observations throughout the process is essential. This meticulous documentation can help track the progress of the troubleshooting, identify patterns, and ensure consistent results. Using a notebook, taking pictures, or recording videos can help capture details that might be missed during the investigation. This comprehensive documentation serves as a valuable reference for future troubleshooting and can even help in identifying recurring issues.
Addressing Common Suspension Noise Culprits: Worn Parts
Identifying the Source of the Noise
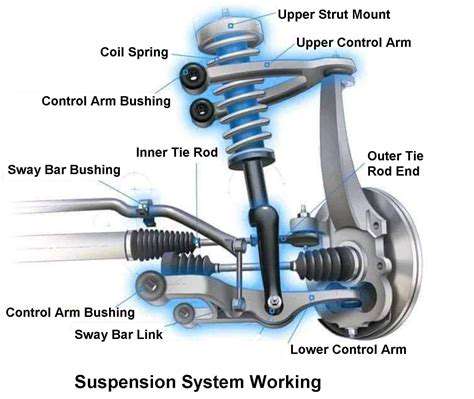
Suspensions are complex systems with many components working together to provide a smooth and controlled ride. Understanding the characteristics of the noise, such as its pitch, rhythm, and location, can help pinpoint the potential culprit. A high-pitched squeal, for example, often suggests a problem with the bushings or ball joints, while a low rumble might indicate worn-out shock absorbers or a damaged spring. Careful observation and documentation of the noise's behavior are crucial in determining the necessary repairs.
Locating the exact area where the noise originates is also vital. Is it coming from the front or rear of the vehicle? Is it more pronounced when turning, accelerating, or braking? These details can significantly narrow down the potential causes and prevent unnecessary troubleshooting.
Checking the Bushings and Ball Joints
Worn or damaged bushings and ball joints are frequent sources of suspension noise. These components allow for smooth movement and articulation of the suspension parts. If these components are worn, they can produce a grating or clicking sound, particularly when turning or going over bumps. Visual inspection and a thorough examination by a professional mechanic can often reveal the extent of the damage.
Inspecting for play in the ball joints and checking the condition of the bushings for cracks or excessive wear is critical. Replacing these parts promptly can prevent further damage and ensure a quiet and safe ride.
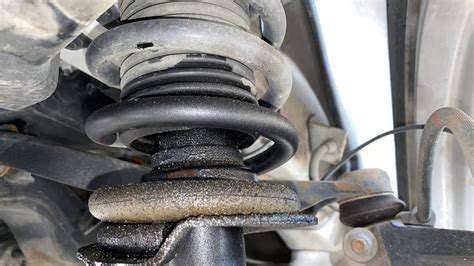
Inspecting the Shock Absorbers
Shock absorbers are responsible for damping the vehicle's movement, absorbing the impact of bumps and providing a comfortable ride. A worn shock absorber can produce a knocking or thumping noise, especially when going over rough terrain. This noise is often accompanied by a feeling of the vehicle bouncing excessively.
Checking for leaks in the shock absorber fluid and assessing the overall condition of the shock absorber is crucial. A professional inspection is recommended to determine if the shock absorbers need replacement, which can significantly improve the ride quality and reduce noise.
Evaluating the Springs
Springs play a crucial role in maintaining the vehicle's ride height and supporting the weight of the vehicle. Damaged or worn springs can lead to a noticeable clunking or rattling sound, particularly when accelerating or braking. This noise often accompanies a noticeable change in the vehicle's ride height.
Inspecting the springs for cracks, damage, or signs of excessive wear is essential. A qualified mechanic can diagnose the severity of the issue and recommend the appropriate repairs or replacements to restore the suspension's functionality and eliminate the noise.
Considering Other Potential Causes
While suspension components are common culprits, other factors can also contribute to suspension noise. Loose or damaged mounting points, worn wheel bearings, or even problems with the exhaust system can sometimes create similar noises. Careful listening and a thorough inspection by a qualified mechanic are necessary to pinpoint the precise source of the problem and ensure the correct diagnosis. This approach is crucial to avoid unnecessary repairs and ensure long-term suspension health.
It's important to note that any unusual noise from the suspension should be addressed promptly to prevent further damage to the vehicle. Ignoring the issue could lead to more significant and costly repairs down the line.
Inspecting and Tightening: Addressing Loose Connections
Identifying Potential Issues
Loose connections are a common problem in many electrical and mechanical systems, often leading to reduced efficiency, increased wear and tear, and even safety hazards. Identifying these issues early is crucial for preventing more significant problems down the line. A thorough inspection, often involving visual checks and potentially using specialized tools, is the first step. This involves carefully examining all connections for signs of movement, corrosion, or damage that could indicate a loose connection.
Visual inspection alone might not always reveal the full extent of the problem. In some cases, a gentle tug test can help determine if a connection is truly loose. However, extreme force should be avoided, as this could damage the connection or the surrounding components. It is important to always prioritize safety and use appropriate tools for the task.
Tools and Techniques for Inspection
A variety of tools can be used to inspect and tighten connections, depending on the specific application. Screwdrivers, pliers, and wire strippers are common hand tools for many tasks. More specialized tools, such as torque wrenches, are essential for ensuring proper tightening and preventing over-tightening, which can damage components. These specialized tools are crucial for ensuring the connection is secure without causing unnecessary stress.
Proper technique is just as important as the tools themselves. For example, when using a screwdriver, ensure that it is properly positioned to avoid slippage or damage. Following manufacturer recommendations and safety guidelines is crucial for effective and safe inspection and tightening. Using the correct tools and techniques is vital to avoid causing further damage.
Tightening Procedures
Once a loose connection is identified, the next step is to tighten it correctly. This involves using the appropriate tools and techniques to apply the necessary torque without exceeding the recommended specifications. Over-tightening can damage components, leading to further problems. Understanding the specific torque requirements for each connection is crucial for preventing damage and ensuring optimal performance.
Preventing Future Issues
To prevent future issues with loose connections, regular inspections and maintenance are essential. Develop a schedule for routine checks and address any identified issues promptly. Using proper connection methods, such as wire connectors or terminals, can also help to prevent loose connections from occurring in the first place. This proactive approach can save time and money in the long run by preventing potential repairs.
Safety Precautions
Safety should always be the top priority during any inspection or tightening procedure. Ensure that the power is turned off to the affected circuit or system before starting any work. Use appropriate personal protective equipment (PPE), such as gloves and safety glasses, to protect yourself from potential hazards. This is a crucial step to prevent accidents and injuries during the process.

Read more about Practical solutions for addressing suspension squeaks and noises